When using the Wintech USB 2.0 to SATA/IDE Adapter and you (old) IDE disk is not recognised by the adapter, try setting your IDE hard drive to the slave setting (or whatever you have not currently set). This is usually done by placing a jumper accordingly.
The jumper configuration documentation is printed on the cover label of IDE drives.
For example, I have an 8 GB IBM IDE hard disk that only works in slave mode.
To hopefully save others from the troubles of finding out the corresponding resistor values on a GA-586TX3 I’ve carefully set up the following table. Please note that I cannot grant any guarantees. I am also not liable for any damage caused by you. Use theses instructions on your own risk.
Please let me briefly note if this table was of any help for you.
All resistors listed are very close to the processor socket and may easily/likely be damaged while mounting a processor heatsink.
| motherboard denotation | resistance | number on SMD resistor |
| R53…R59 R210,R211 R213…R215 | 4.7Ω | 472 |
| R216 | 10Ω | 103 |
| R212 | 1Ω | 102 |

Image 1: A resistor split on my board while attaching a heatsink to the socket.
Ich konnte die Bedienungsanleitung bei AEG nicht finden. nach stundenlangem probieren habe ich es herausgefunden und möchte den Vorgang teilen:
- Schließen Sie das Gerät ans Stromnetz an
- Die digitale Uhranzeige blinkt und zeigt den Text “00:00”
- Drücken Sie (mit der linken Hand) gleichzeitig die Tasten “15” und “100%” unmittelbar unter dem Display und halten Sie diese gedrückt
- Drehen Sie (mit der rechten Hand) an dem Drehknopf mit dem Uhrsymbol, um die aktuelle Tageszeit einzustellen.

Reinigung der Trommeleinheit bei den Brother-Druckern
HL-2130
HL-2132
HL-2135W
HL-2220
HL-2230
HL-2240
HL-2240D
HL-2242D
HL-2250DN
HL-2270DW
Das deutsche Handbuch beschreibt den Vorgang falsch. Folgt man den Anweisungen passiert – nichts! Nach viel Frust und ausprobieren habe ich einen verlässlichen Weg gefunden.
So geht es richtig:
- Legen Sie ein leeres Blatt (A4- oder Letter-Format) bereit.
- Vergewissern Sie sich, dass sich das Gerät im Bereitschaftsmodus befindet.
- Öffnen Sie die Abdeckung der manuellen Zufuhr. (Nicht verfügbar für HL-2130/HL-2132/HL-2135W/HL-2220)
- Stellen Sie die Papierführungen der manuellen Zufuhr mit beiden Händen auf die Breite des Papiers ein, das Sie verwenden.
- Öffnen Sie die vordere Abdeckung und die hintere Abdeckung (Papierausgabe mit Druckseite oben).
- Drücken Sie Go fünfmal.
- Schließen Sie die vordere Abdeckung. Das Gerät bereitet sich für die Trommelreinigung vor. Die Ready-LED blinkt.
- Schieben Sie während des Blinkens ein Blatt Papier (A4- oder Letter-Format) mit beiden Händen in die manuelle Zufuhr ein, bis die Vorderkante des Papiers die Papierzufuhrrolle berührt. Lassen Sie das Papier los, sobald Sie merken, dass es vom Gerät eingezogen wird. Die Ready-LED leuchtet. Das Gerät beginnt mit der Trommelreinigung. Während der Trommelreinigung blinkt die Ready-LED.
- Wenn der Reinigungsvorgang abgeschlossen ist, kehrt das Gerät in den Bereitschaftsmodus zurück.
- Wiederholen Sie die Schritte 5 bis 9 zweimal und verwenden Sie jedes Mal ein neues leeres Blatt Papier. Entsorgen Sie anschließend das gebrauchte Papier.
It took me quite some time and tinkering to find out that apparently the Intel B85 SATA controller does not work with the OCZ Vertex 2 SSD.
The problem exhibits as the drive sometimes playing dead on system startup or random I/O errors to the device in the Windows system protocol as well as random I/O errors for the device when using a Live Linux USB session. I suppose it is a specific controller-to-controller issue, because the OCZ SSD just works fine in at least two other (non-Intel) PCs and other non-Vertex2 SSDs just work fine with the Intel B85 mainboard.
Finally I found posts like on notebookreview , overclock.net that tell us the Sandforce SF-1000 family controllers do not play along with the Intel 8th gen Haswell SATA.
Hardware used:
- Gigabyte B85M-D2V, BIOS Version F1
- OCZ Vertex 2, unknown Firmware
I hope my findings are useful for others.
This is my suggestion on how to reduce the noise in 2-bay Synology disk stations by adding sound dampening (absorber) material. Optionally you may choose to replace the internal 92mm fan with a more silent one.
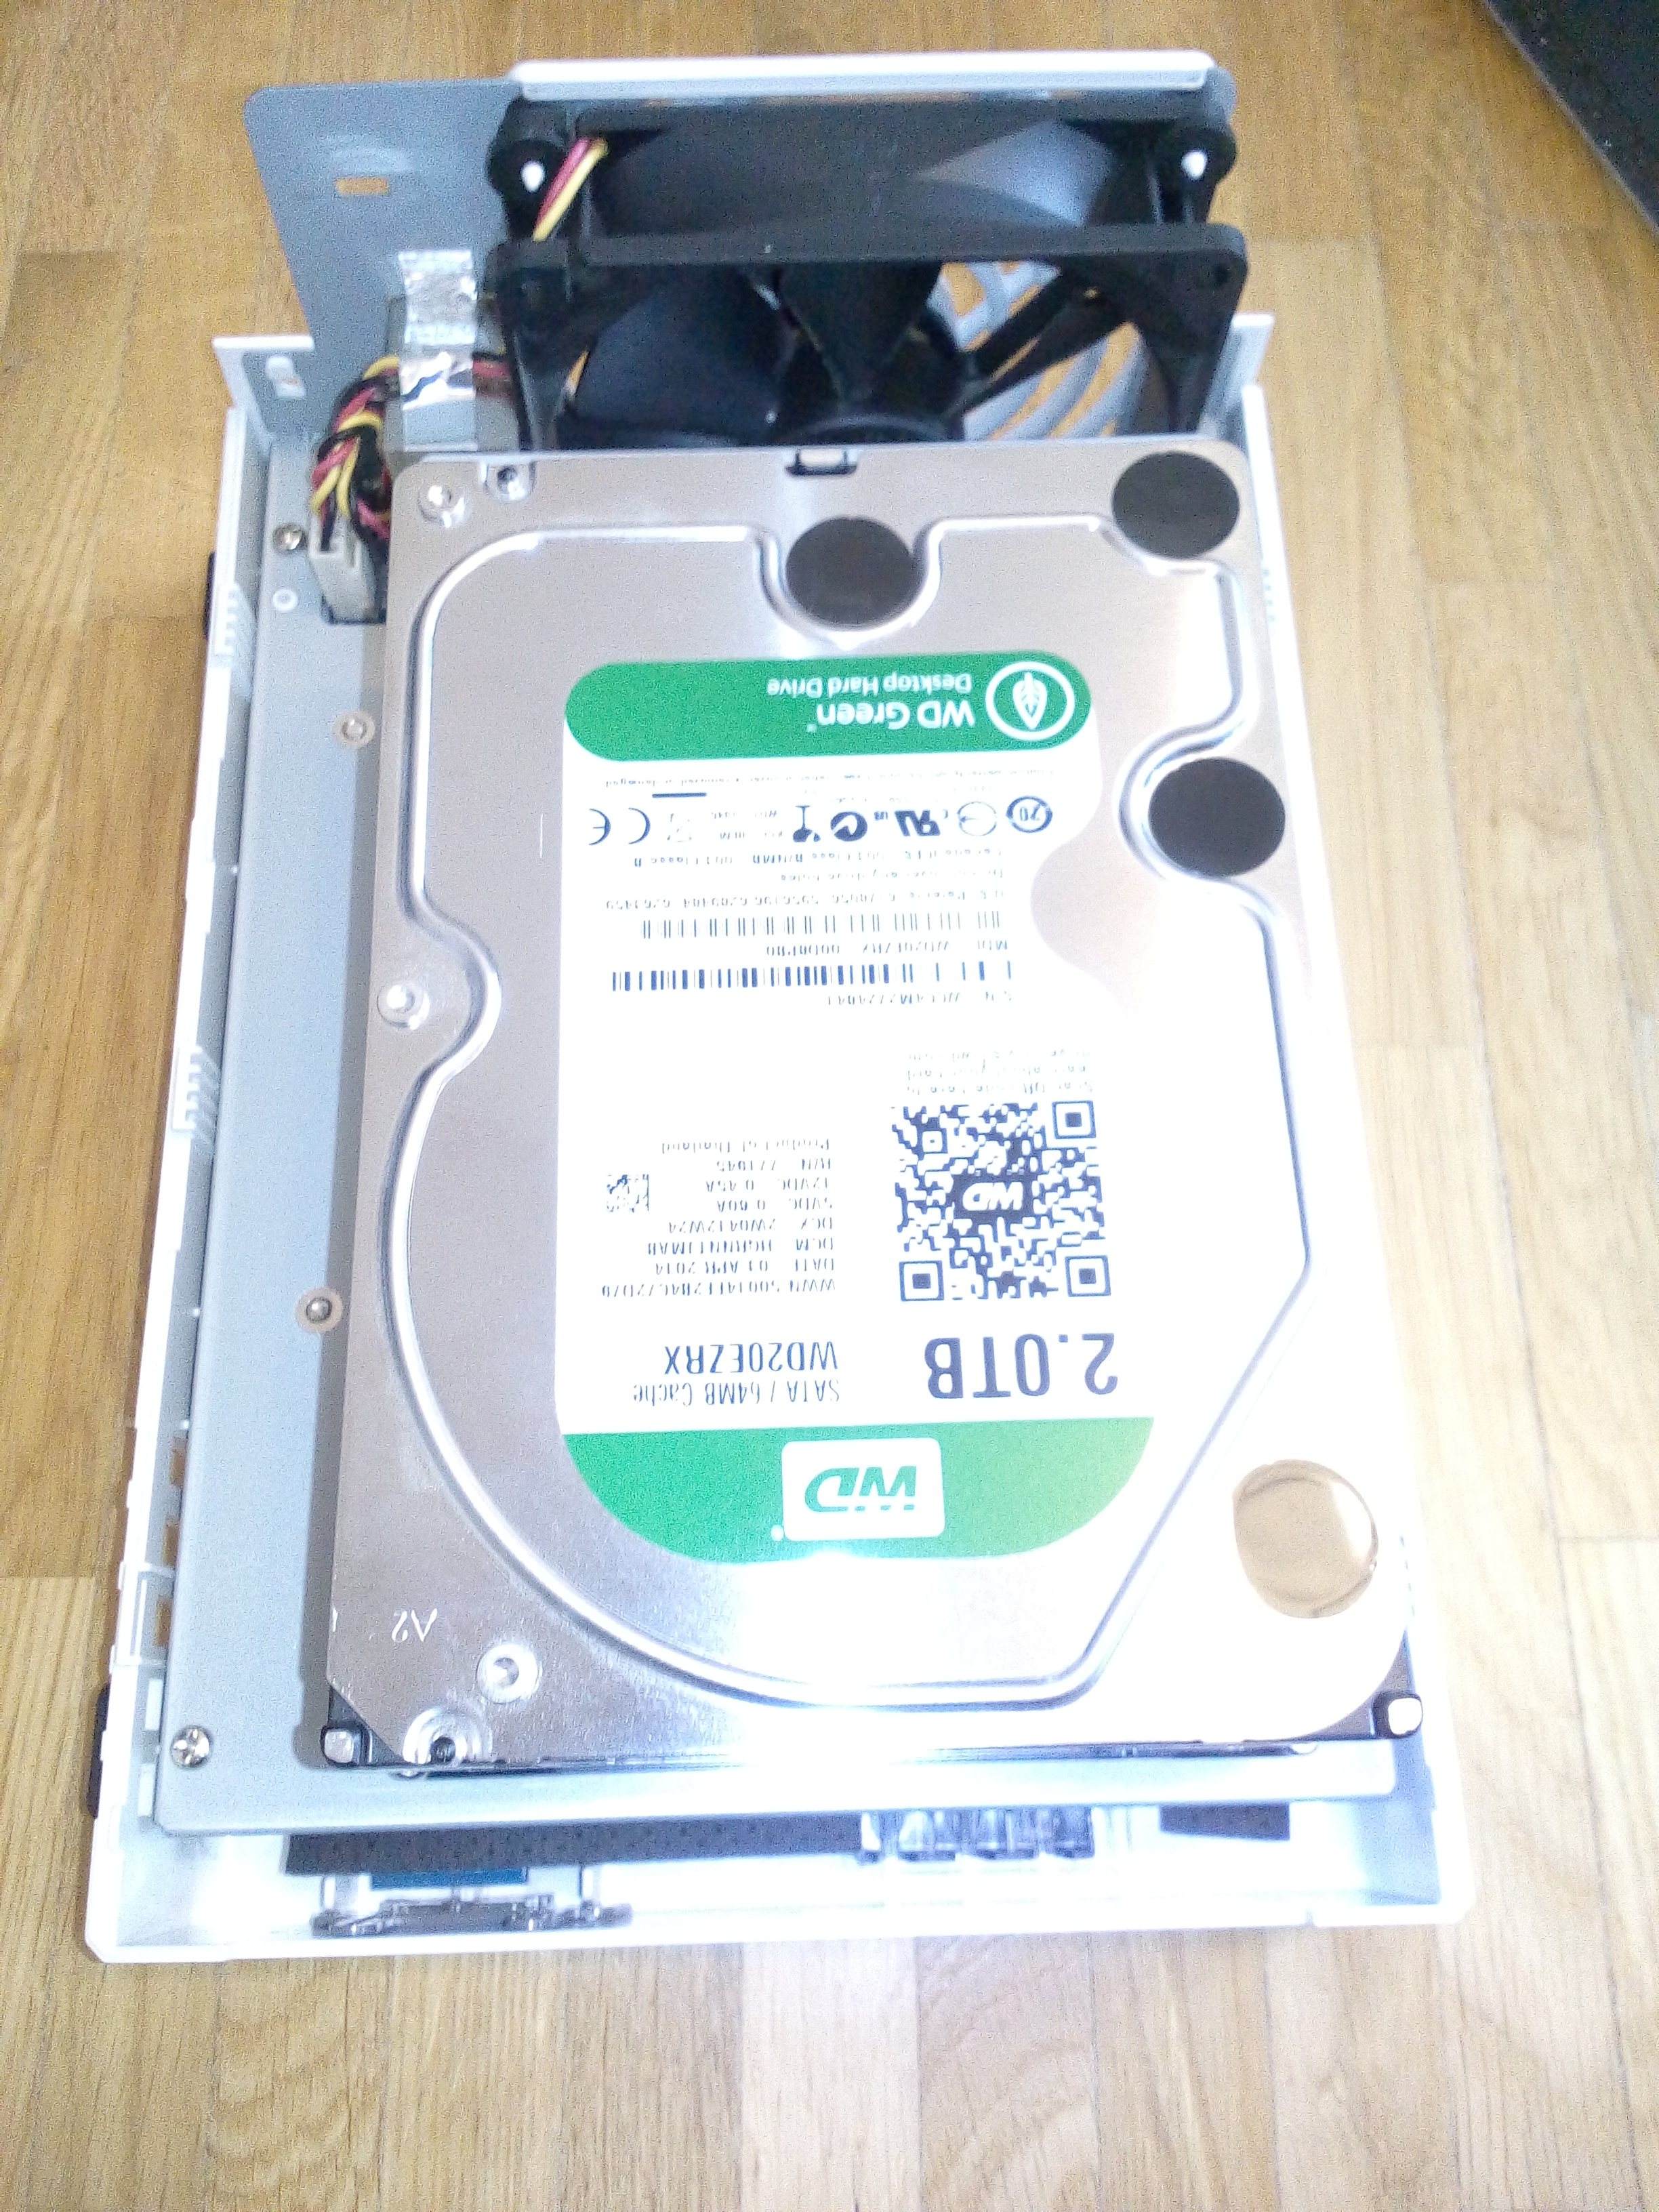
I bought a used 2-bay Synology disk station (model DS216se). It is populated with two already rather quiet 3,5″ hard drives (each about 23dB when idle and running 5800 rpm).
Being a huge fan of silent hardware I was rather unhappy with the noise level radiating from it. Fortunately I had some self-gluing noise absorber material left over from previous PC builds. It does not have to be special PC case absorber material. In theory you can use noise absorber from any DIY shop or the dealer of your choice.
The basics
- Try to use already quiet disk drives. The faster the disks internally spin (RPM), the noisier they are.
- Do not cover any case vents. Do not cover the case fan. They are there for a reason.
- Do not directly cover heat sources like your hard drives.
- Do not entirely fill up the case with any material. Some space needs to be left for airflow.
I recommend the following steps:
- Open the NAS case as per the user manual.
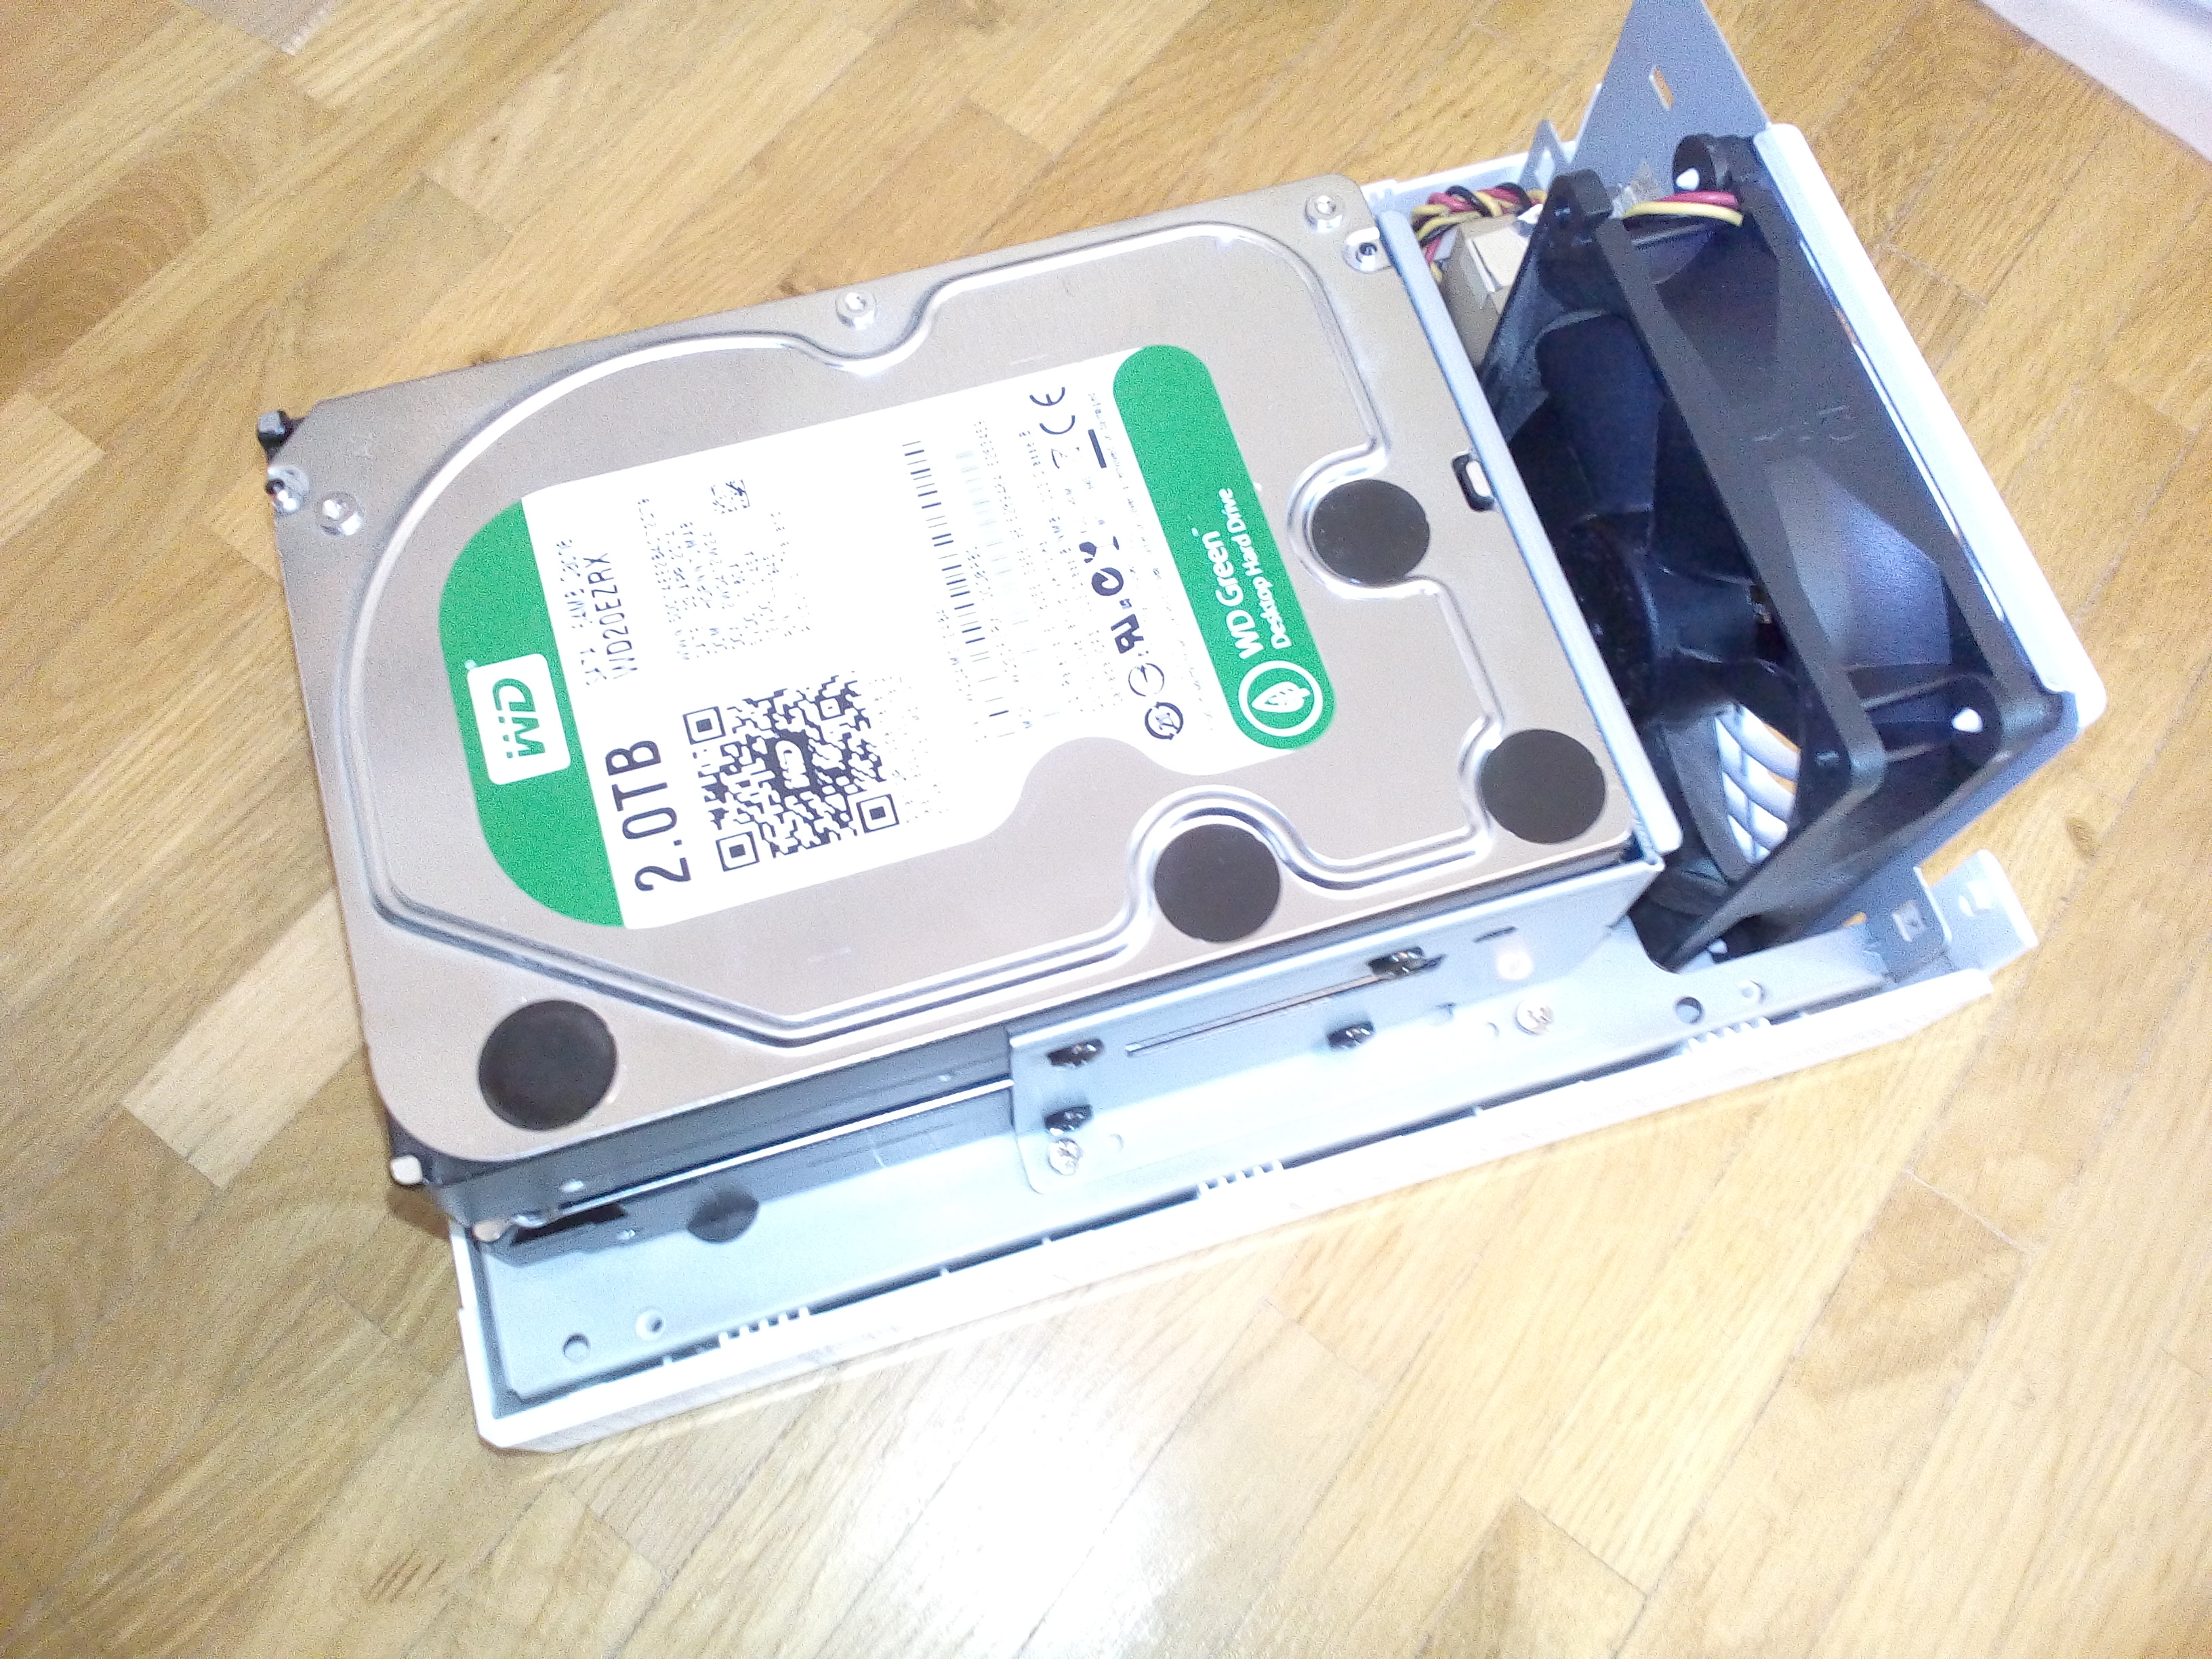
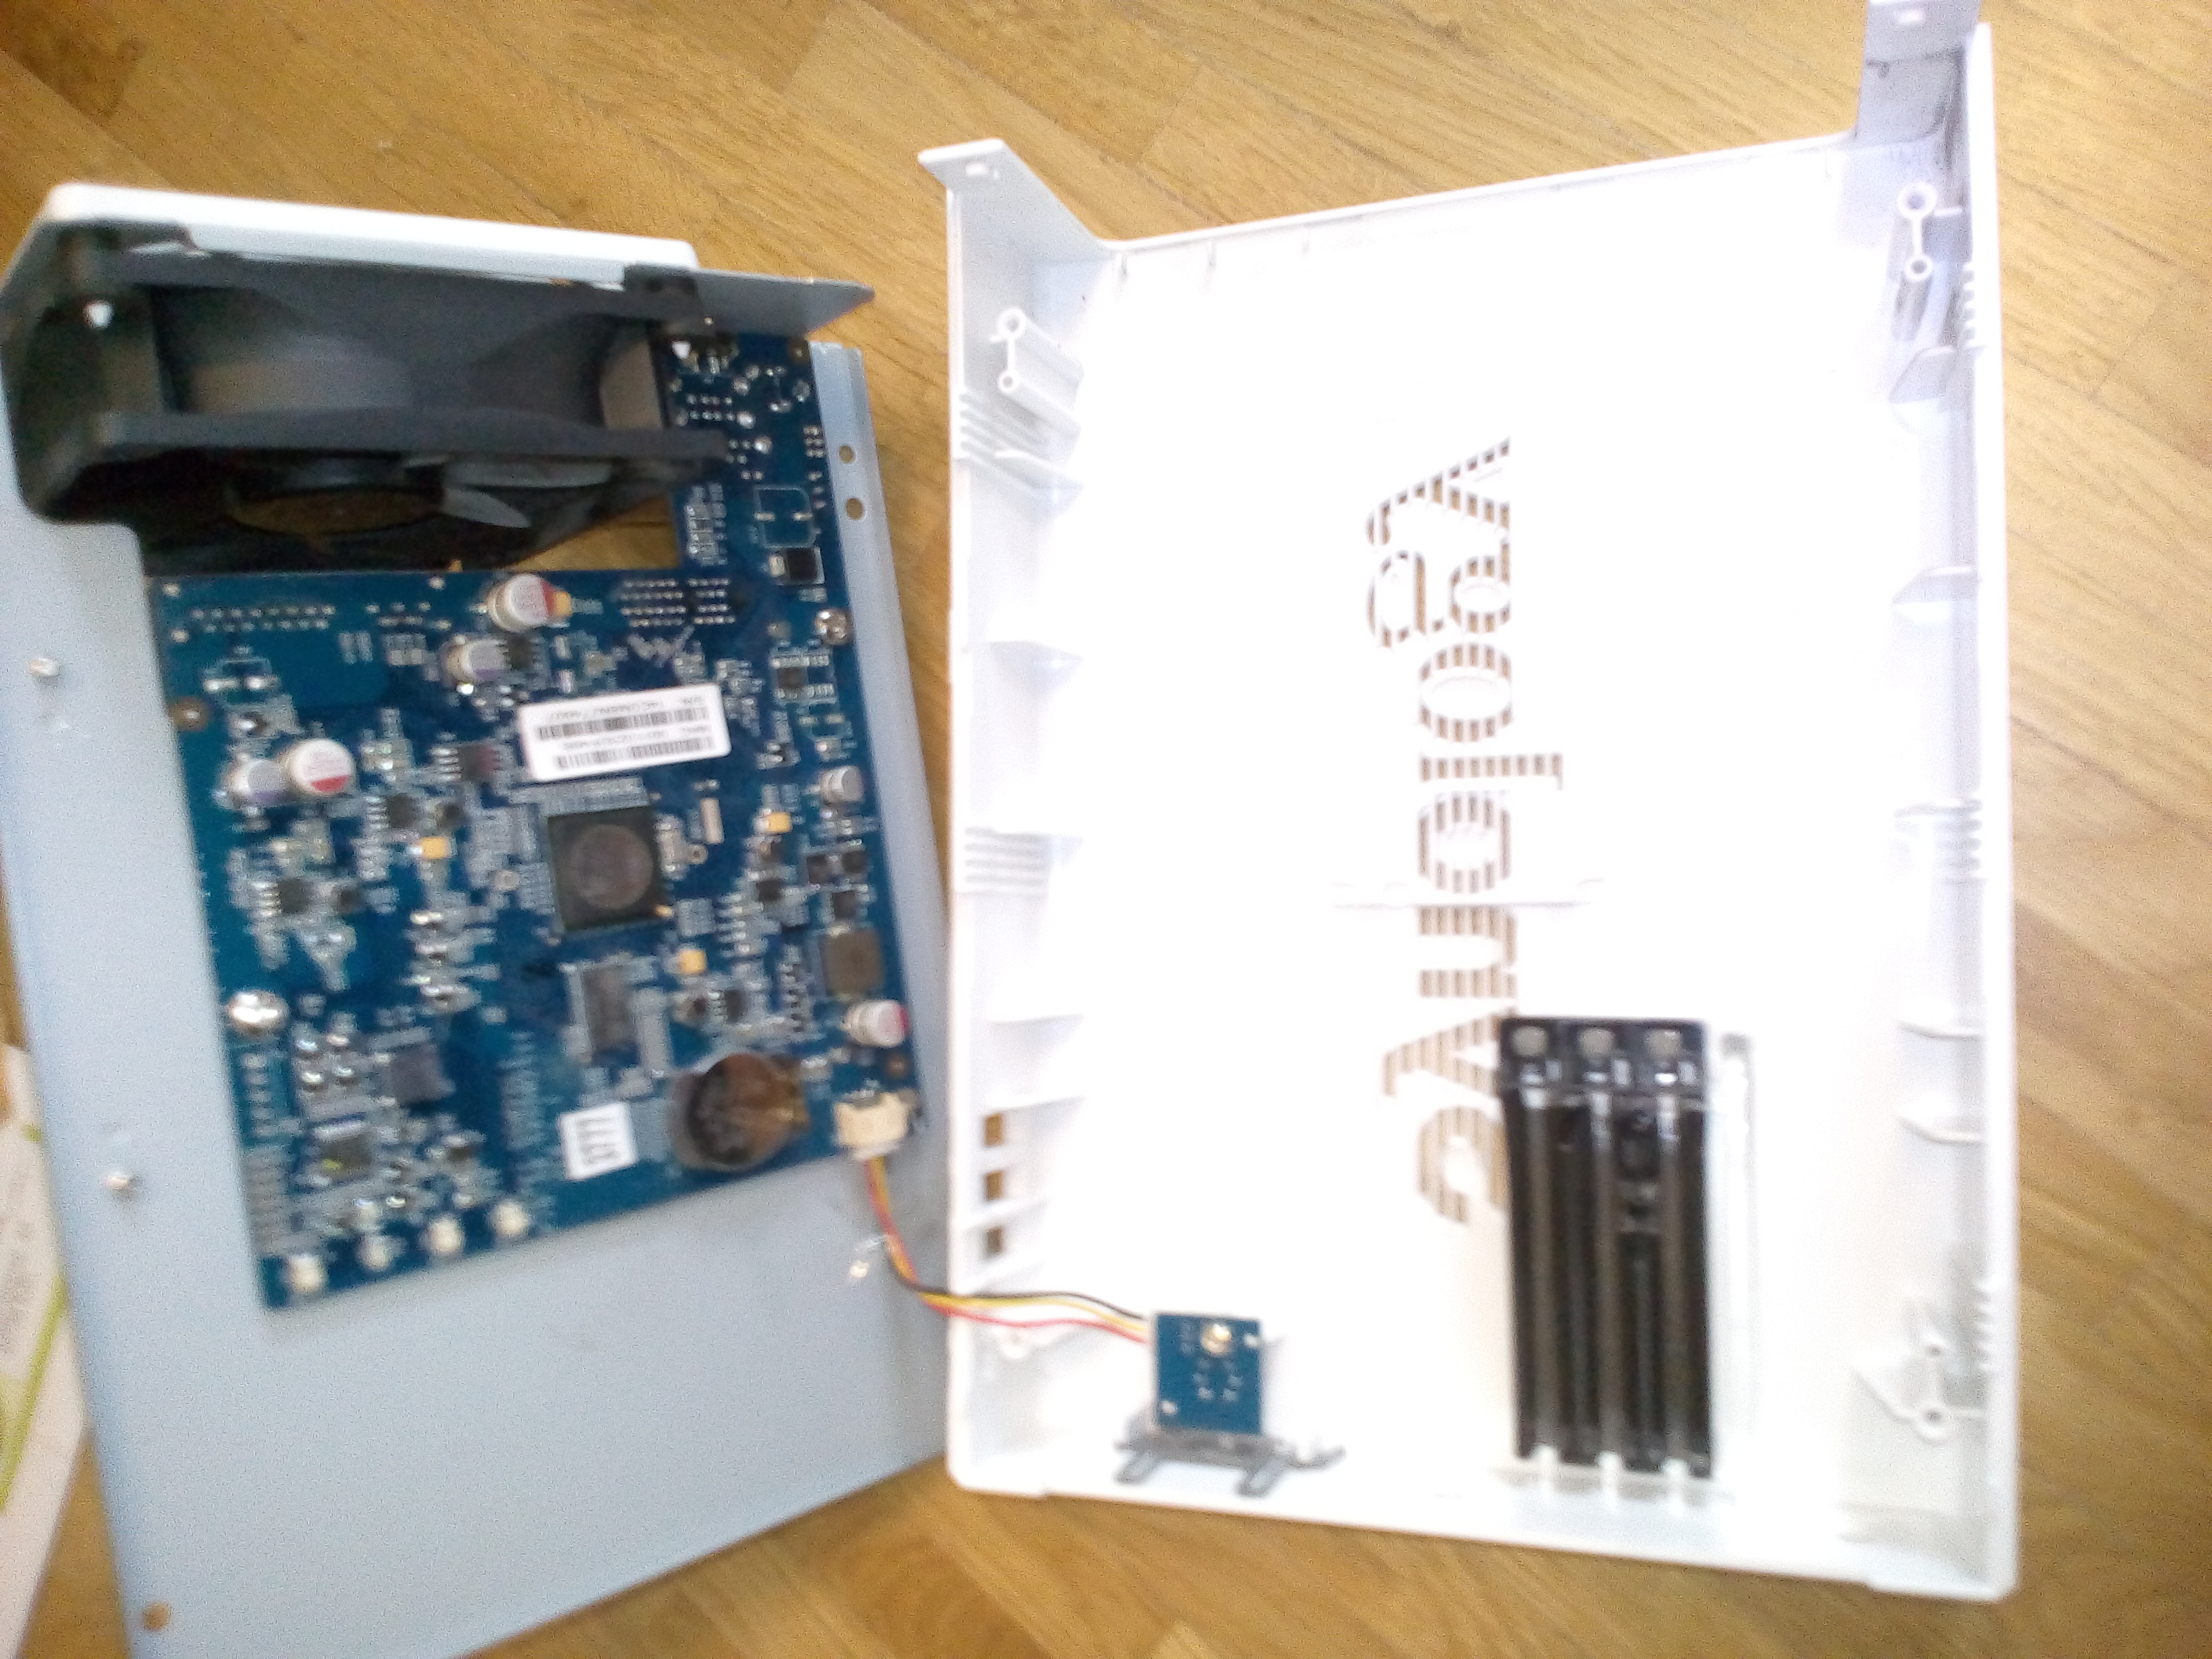
- Unscrew the four screws that fasten the base plate against the other half of the case. Carefully lift the base plate. Both parts are connected by wires.
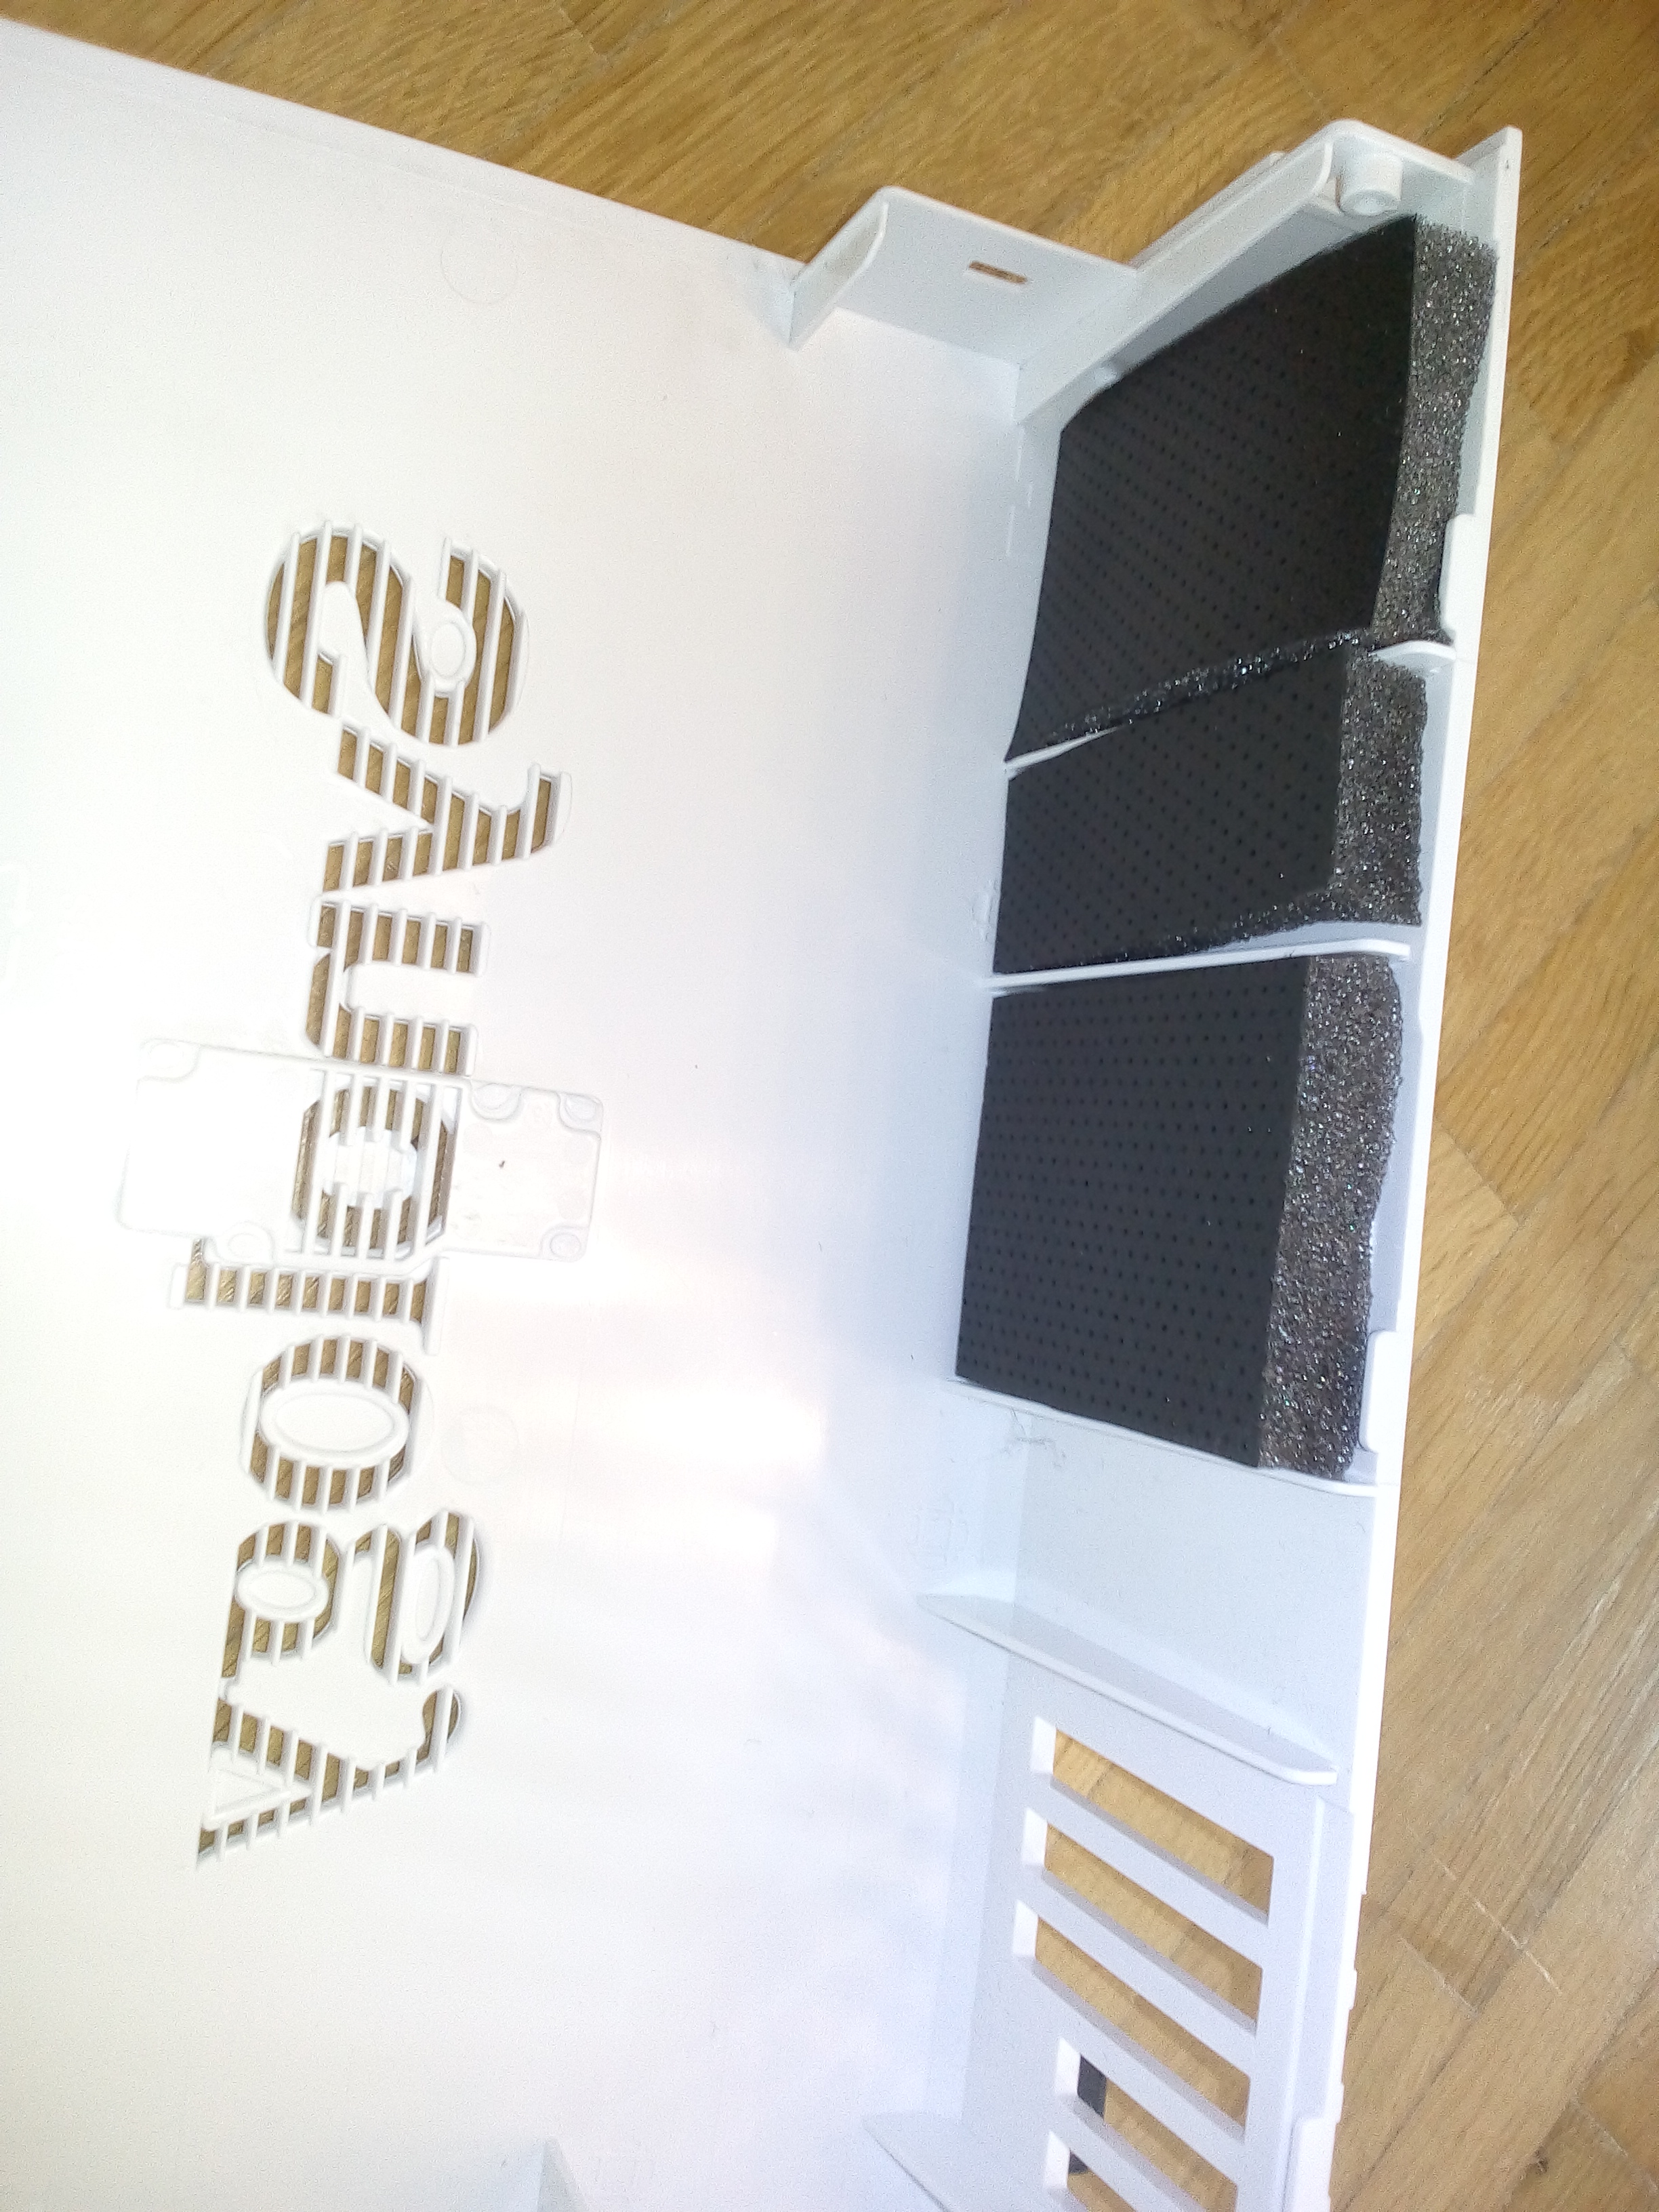
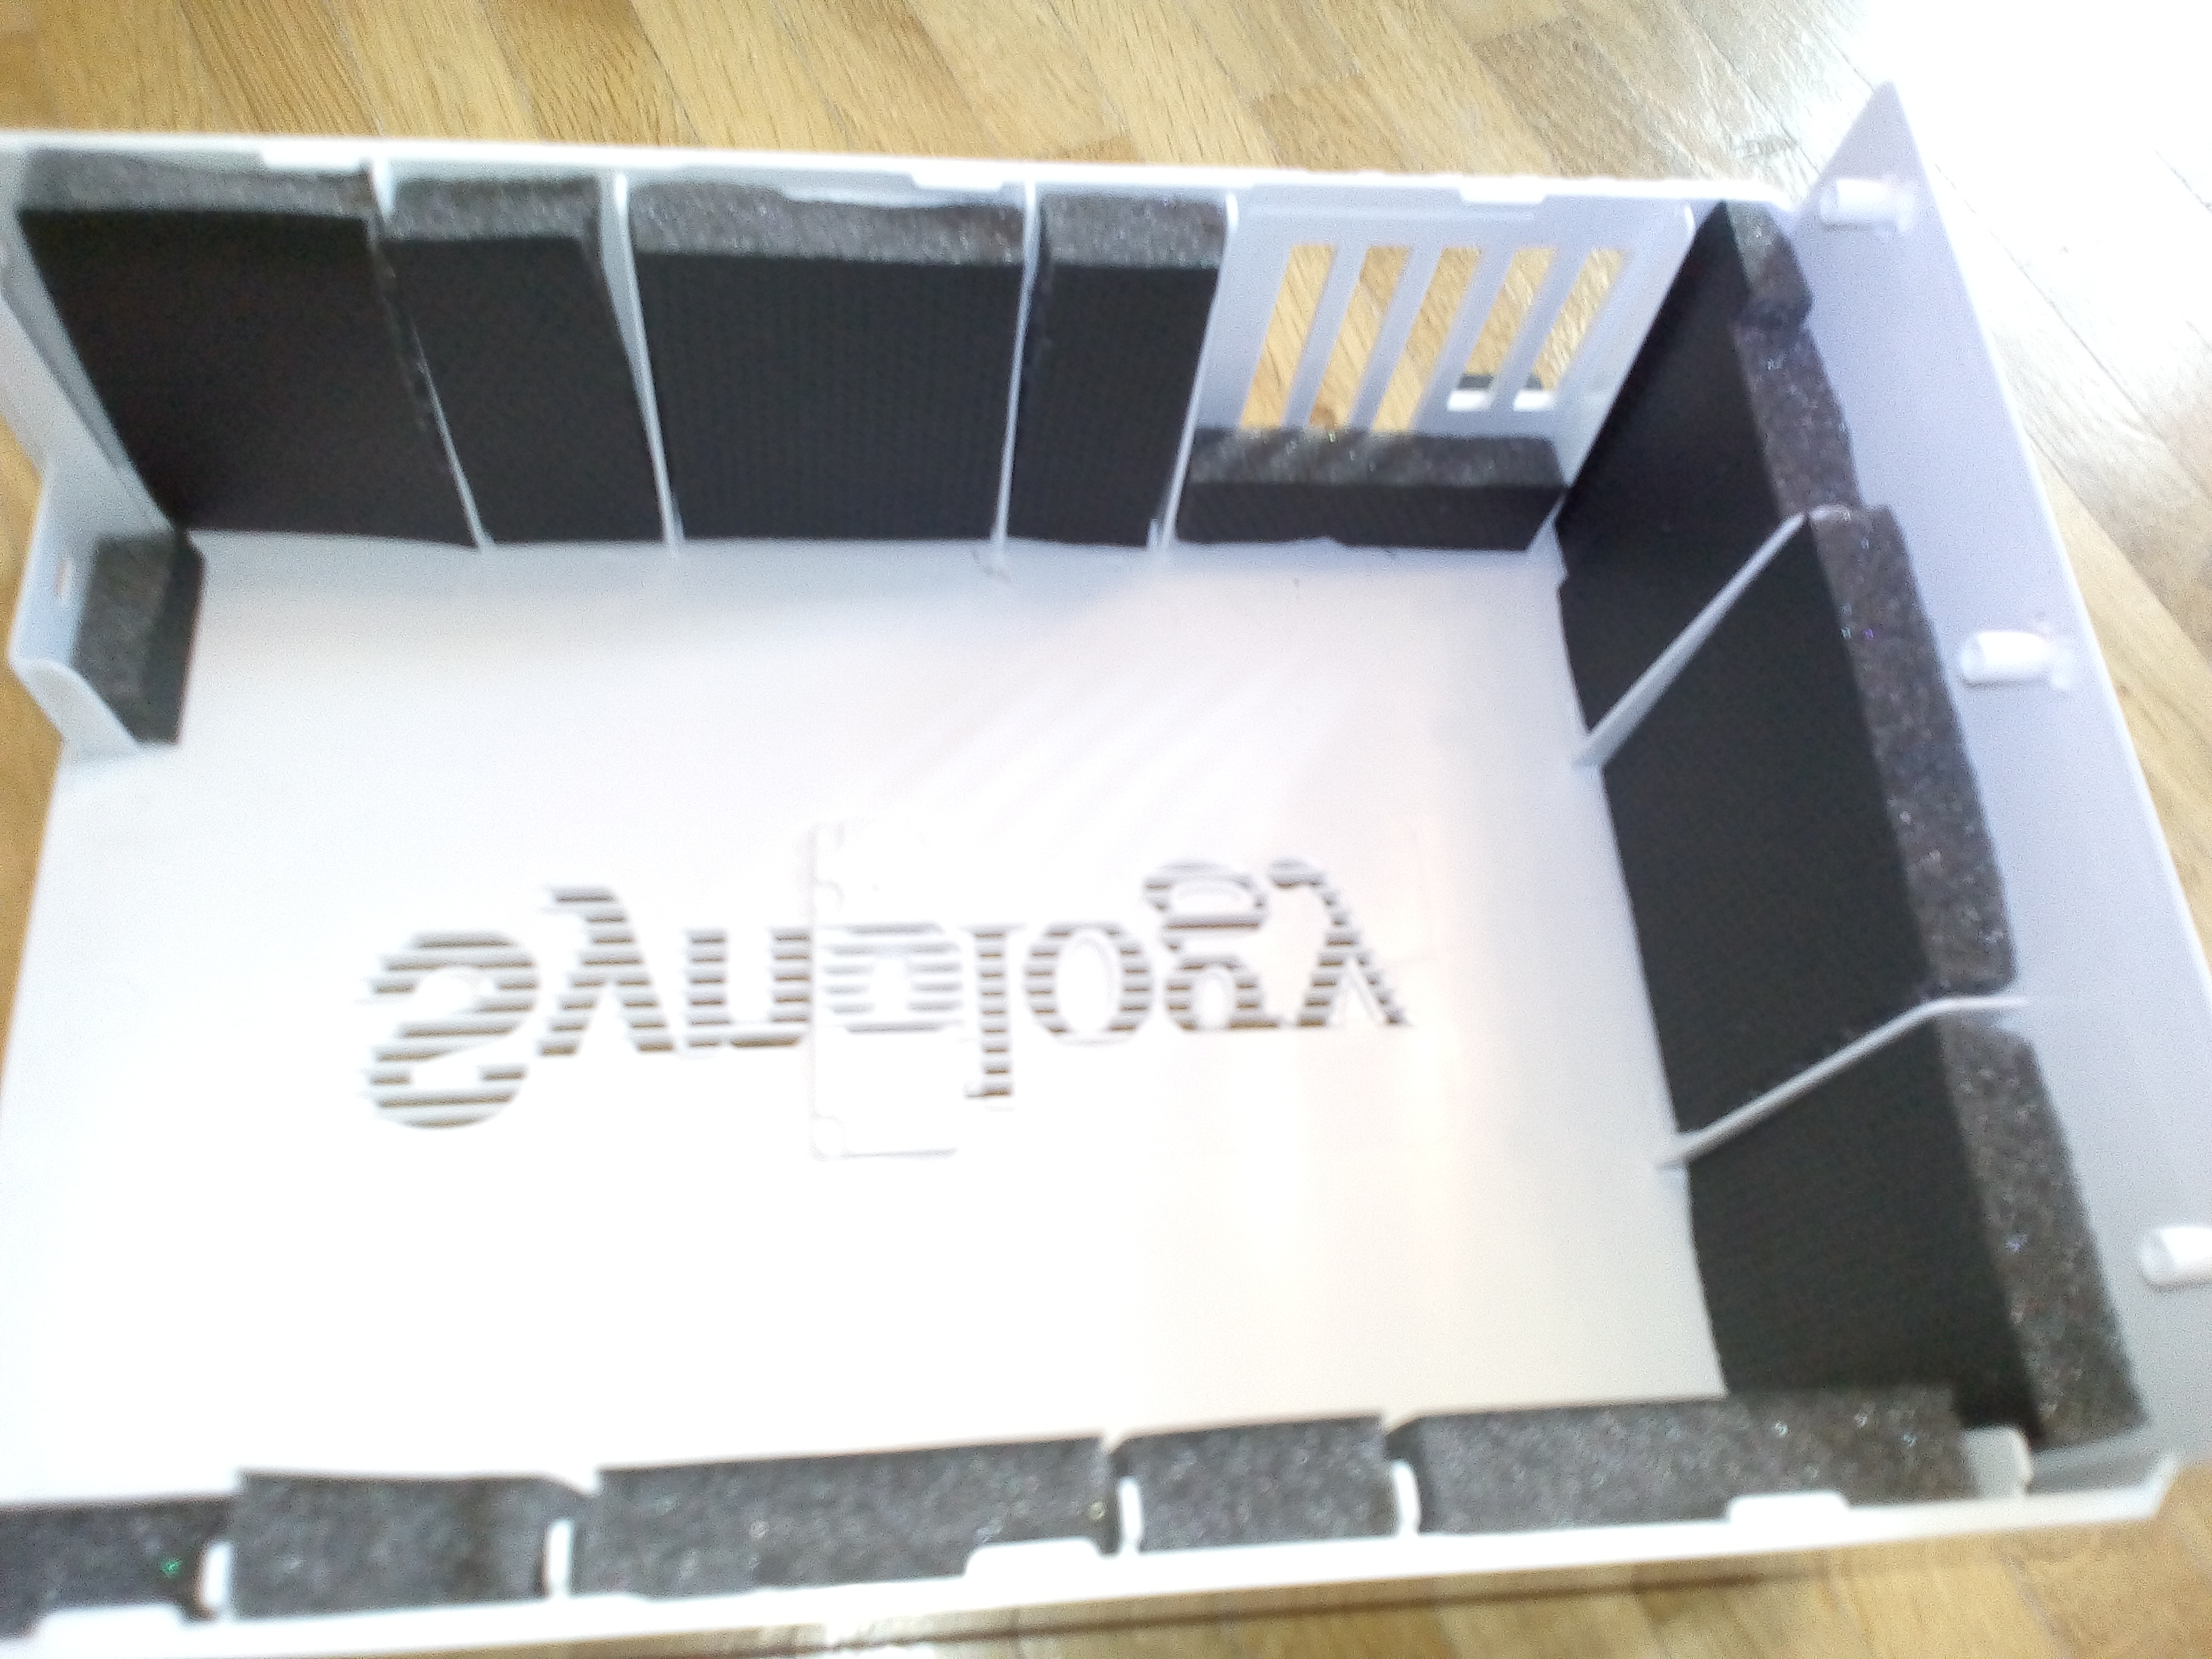
- For the case side cut noise dampener as shown in the picture below. Use scissors or a carpet cutter. Not that I left some space at the right end in the picture. When assembled the fan unit touches the case plastic, so leave this area untouched. Emit the area around the light guiding plastic. I also cut a bit off the edge for the cable to pass.

- Now reassamble both parts carefully and fasten the four screws again.
- Next up is the other case half. Unfortunately we need to skip the side with the Synology font as there is barely space between it and the top hard drive. In addition we do not want to block the airflow. So we will stick to the top and bottom sides of the cover. I placed the material in between the plastic fins.
Done. The modifications are invisible but audible!
As disk temperatures stay below 30°C I will replace the internal 92mm fan with a silent fan. Note that less airflow will result in higher internal temperatures.


For the replacement fan, make sure the fan voltage is the same 12V and that it also has a 3-pin molex connector.
If you really want to add a physical device or physical partition as virtual drive to your virtual machine, then these insttructions are for you.
WARNING. Be sure you know what you are doing. If your host operating system and the virtual machine access the same partition with write access, DATA LOSS will occur. Never try to boot your host operating system in a virtual machine!
- Find the physical drive or physical partition you want to add. I recommend the following way. The id-name includes the vendor name and model name of the device and that gives a good hint that it is actually the device you are looking for. The end of each line gives you the link to the block device, which you may be more familiar with.
$ ls -l /dev/disk/by-id/
insgesamt 0
lrwxrwxrwx 1 root root 9 23. Jul 21:05 ata-Crucial_CT256MX100SSD1_14360D295569 -> ../../sda
lrwxrwxrwx 1 root root 10 23. Jul 21:05 ata-Crucial_CT256MX100SSD1_14360D295569-part1 -> ../../sda1
lrwxrwxrwx 1 root root 10 23. Jul 21:05 ata-Crucial_CT256MX100SSD1_14360D295569-part2 -> ../../sda2…
2. Add the device or partition to your existing virtual machine. In virt-manager, open the virtual machine window.
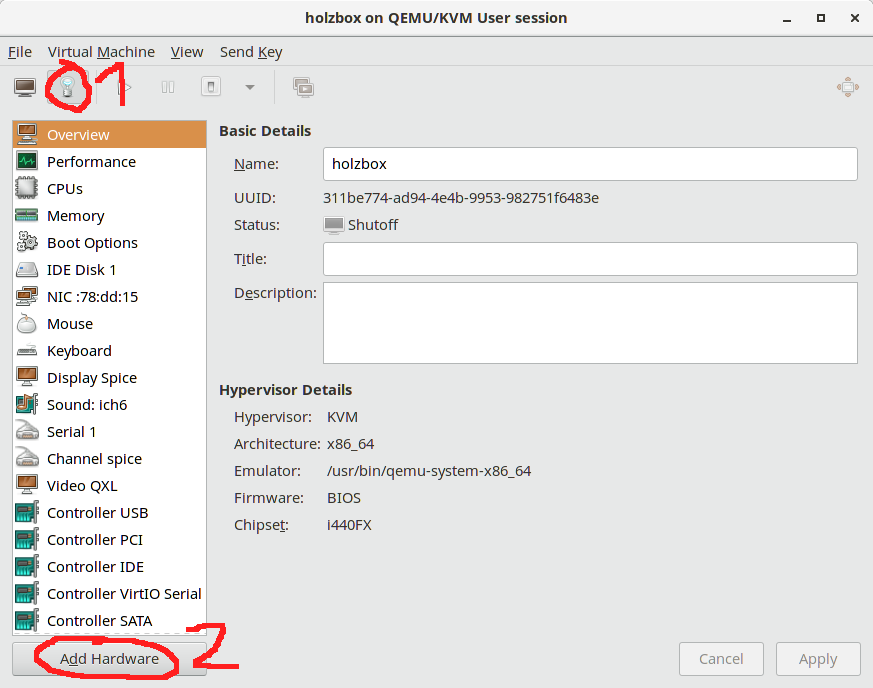
Click on the light bulb to bring up the virtual hardware details. Then select Add Hardware at the bottom.
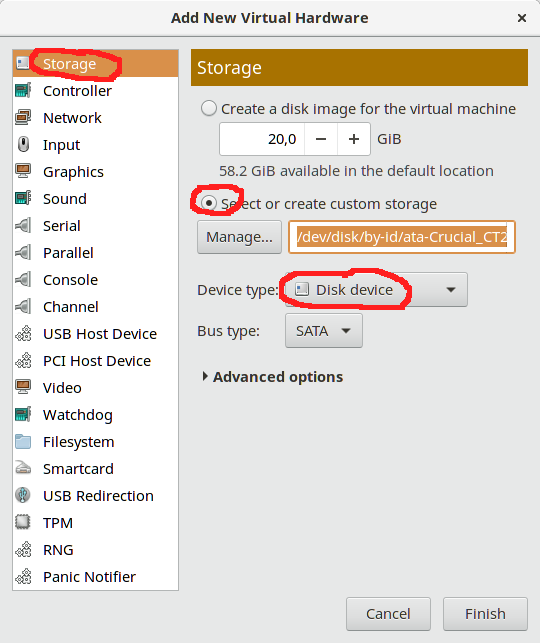
We want to add a storage, and as device type choose Disk Device. Choose the radio button labelled “Select or create custom storage”. In the corresponding text input field, paste the name of the physical device or partition that you chose before. Set the Bus type to your liking, usually SATA or IDE are a good choice. Click finish and the physical device is added.
3. Make sure the boot device is what you want it to be.
Enjoy.
If you are running a laptop that is using the Realtek rtl8723be WiFi chip, like
- HP 15-ba520ng
- HP Pavilion 15-R189NG
- HP AC179TX
- Lenovo Y50-70
- HP AC-635TU
and you are experiencing a very weak Wifi signal, then I can most likely explain why and provide a solution.
The reason for the chip performing poorly is because of the manufacturer saving money the wrong way. The Wifi adapter rtl8723be has two connectors for aerials (antennas) and your manufacturer decided to save money and only connect one antenna. Look at the top right of the adapter card to see both connectors, with the right one attached to an antenna.
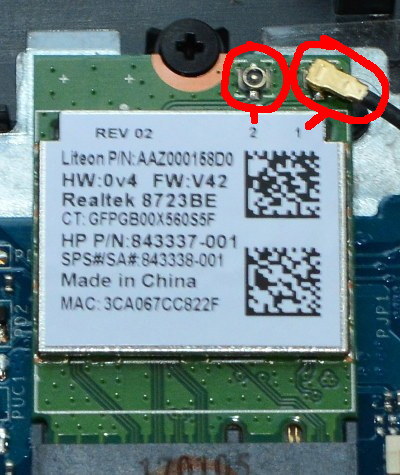
Fair enough, but the adapter itself defaults to using connector 1, wheras your manufacturer decided it is a terribly clever idea to connect the only Wifi antenna cable to connector 2.
That being said, the obvious hardware fix is to move the antenna cable from port 2 to port 1. I did this without tools, use your finger nails and pull the antenna connector off while turning your hand back and forth clockwise/counter-clock-wise. I used a flat screw driver to press the aerial connector into connector 1. Dont use excessive force.
But opening the laptop may be difficult or you do not feel up to the task. The software fix is to tell the wifi driver to use antenna port 2 only.
On Linux you can do it with the following steps:
- Check that you really have that wifi adapter. Open up a terminal and run
lspci | grep Network
You should see a message like
03:00.0 Network controller [0280]: Realtek Semiconductor Co., Ltd. RTL8723BE PCIe Wireless Network Adapter [10ec:b723]
2. Tell the wifi driver to use antenna port 1. This should work with kernel 3.17 and newer. You need administrator priviledges to do so:
sudo echo "options rtl8723be ant_sel=1" >/etc/modprobe.d/rtl8723be.conf
If for any reason this does not help you in the later course, delete the file /etc/modprobe.d/rtl8723be.conf and repeat above step with “ant_sel=2”.
3. Apply the new setting by either rebooting or running the following
sudo rmmod -r rtl8723be
sudo modprobe rtl8723be
4. Check if your wifi signals are at the level that you expect.
On Windows it is said in forums that installing the HP driver(s) is the easy solution. I cannot verify this.
Do you have a laptop model that is not mentioned in my list and that you could fix using my instructions? Please let me know and I will gladly add it.
I suppose this might work for Windows 7/8 as well.
This method also uses command line tools. For the most easiest way suitable for beginners try using unetbootin or on the Windows platform try using Rufus.
This is how to do it:
- Obtain the Windows ISO image file by any of the legal channels. As of today (2016) Microsoft offers them for free on their website.
- Have an USB mass storage device, such as an USB thumb drive or USB hard disk. The minimum device capacity depends on the ISO file size. 8GB should suffice, sometimes 4GB.
- Prepare the USB drive to be able to start an operating system on it. This probably is the hardest part. The boot sector of the USB device needs to carry a program that finds an operating system and initiates the loading of it. On IBM compatible PCs traditionally the first 446 bytes are reserverd for that purpose. The remaining of the first 512 bytes hold the partition table that stores information about all partitions on the respective drive. The syslinux package provides several boot loaders, install it.
Fedora:
# dnf install syslinux
Ubuntu/Debian
# apt install syslinux
Manjaro/Archlinux:
# pamac -S syslinux
4. It contains the mbr.bin image of a generic boot loader. A typical place for the file is /usr/lib/syslinux/bios/mbr.bin .Write the mbr.bin to the first data sector of the USB drive. You need to find out the device name of your USB drive, e.g. using
parted -l
Then write the image. I assume /dev/sdd is the USB drive
dd bs=440 count=1 conv=notrunc if=/usr/lib/syslinux/bios/mbr.bin of=/dev/sdd
5. Create an NTFS partition as primary partition on the USB drive. Be sure to set the BOOT flag of that partition. This is crucial or the boot loader won’t start the OS on that partition. It must be big enough to hold all files of the Windows 10 ISO image. A size of 5 to 6 Gb should do. You can use e.g. gparted to create the partition.
6. Mount the new partition and also the Windows ISO image. Use your favourite file manager to do so, or the command line like
mount /dev/sdd1 /run/media/newpartition
fuseiso -p /ISO/Win10_1511_x64.iso /run/media/Win10ISO
7. Finally copy all files from the Windows ISO onto the USB partition.
Deleting Multiple Photos on Nikon D7100 and D7200
How to delete multiple photos in one go:
- Turn on your camera with the memory card(s) inserted
- Press the Menu button.
- Select the topmost icon. This brings up the PLAYBACK menu.
- Move the cursor to the right list and highlight Delete. Press OK to enter the Delete Menu.
- Choose either
- Selected to select certain images in a following step and delete them,
- Select Date to delete all images within the range of certain date(s) or
- All to delete all photos on your memory card.
